For workflows that are invoked by other workflows or run directly from the Workflow Designer, you can specify input and output parameters. Input parameters are ways of specifying what information a workflow needs either from an invoking workflow or from the person who is starting the workflow. Output parameters delineate which information the workflow will provide, when it finishes running, to the workflow that invoked it. Input and output parameters are configured and available as tokens.
Example: A workflow processes incoming purchase orders. If a purchase order is over $1500, it must go through an additional level of approval before the workflow can finish processing it. To handle this situation, the workflow uses a Conditional Sequence activity to check the purchase order's amount, and if the amount is over $1500, the Conditional Sequence activity runs an Invoke Workflow activity. The invoked workflow has some input parameters that gather the name of the user who initiated the invoking workflow and the due date for the purchase order as calculated in the invoking workflow. This information is then available to the invoked workflow as tokens. When the invoked workflow finishes, it passes output parameters back to the invoking workflow. These output parameters are tokens that note if the purchase order was approved and who approved it.
Note: The maximum combined amount of data that can be included in input/output parameters may not exceed 4MB. Exceeding this limit will cause the instance to terminate with a "Completed" status, and to appear in the Workflow Admin Console's "Failed Instance Completion" page with an error.
To define input parameters
- Open the workflow you will be starting either with the Invoke Workflow activity or manually.
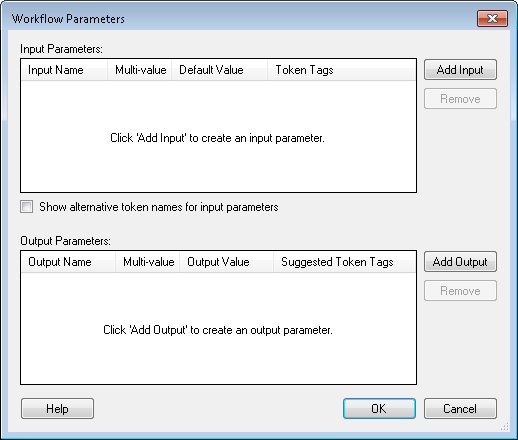
- In the workflow's Properties Pane, under
 Input/Output Parameters, select Configure input/output parameters.
 - In the Workflow Parameters dialog box, click Add Input to configure an input parameter. Input parameters are information this workflow wants to receive from an invoking workflow or user.
- Specify a name for the information that will be received as input, and click OK. This name will also be the name of a token that will be replaced by this input parameter's value when the workflow runs.
- Select the checkbox under Multi-value to allow this input parameter to received multiple values. Additionally, if you select this checkbox, the token produced by this input parameter will be a multi-value token.
- Under Default Value, click the link to specify a default value for the input parameter. If an invoking workflow or user who is manually starting this workflow does not provide a value for this parameter, the default value specified here is used instead.
- Under Tags, click String (the default tag) to select tags that describe the parameter. The tags specified here will also be the token tags for the token produced by this parameter. More information.
- Repeat steps 3 through 7 to configure additional input parameters.
- Optional: Select Show alternative token names for input parameters to see or specify alternative names for the input parameters. If someone changes the name of any input parameter, that name will be listed along with the original name. Thus, any workflows that invoke this workflow still be able to provide the correct values for these parameters even if their names changed.

Tip: If you are creating a multi-value parameter, you can provide more than one value here (as you add values more spaces will appear to allow you to specify additional values), reorder the values with the green up-and-down arrows  , and remove values with the red X
  .
.
To define output parameters
- In the Workflow Parameters dialog box, click Add Output.
- Under Output Name, specify the name of the parameter you want this workflow to pass along to the workflow that invoked it, and click OK. This name will be the suggested token name for the token that will be available in the invoking workflow and that will be replaced by the output value produced by this workflow.
- Select the checkbox under Multi-value to allow this output value to have multiple values. Selecting this checkbox will also make the output parameter become a multi-value token in the invoking workflow.
- Optional: The Use the Assign Token Values activity to set the values of output parameters option lets you define the output parameter's values in the course of the workflow (with an Assign Token Values activity) instead of in this dialog box. Leaving this option selected lets you define values for the output parameters, with the Assign Token Values activity, at specific points in your workflow. Clearing this option lets you configure all your output values in one place and prevents your workflow from becoming cluttered with Assign Token Values activities.
- If you cleared the User the Assign Token Values activity to set the values of output parameters option, under Output Value, click the link to specify the value that this output parameter will have. The output parameters configured here will be passed along to the invoking workflow in the form of tokens.
- Under Tags, click String to select tags that describe the output parameter. The tags specified here will also be the suggested token tags for the token produced by this parameter. More information.
Tip: If you are creating a multi-value output parameter, you can provide more than one value (as you add values, more spaces will appear to allow you to specify additional values), reorder the values with the green up-and-down arrows , and remove values with the red X .